
- (English edition of leo’s Chinese original 設置-llm-wiki-環境.)

- You upload a document, the AI reads it, turns it into an article, writes it into your GitHub repo, and updates the index. After that you can just ask it questions.
-
You need a GitHub credential first. If you haven’t set one up, see Setting-Up-GitHub-Credentials-for-n8n.
-
Part 1 — Setting up the environment
-
 @GitHub | Step 1 — A repo is just a cloud folder
- Like a Google Drive folder, except every file inside has a detailed version history. On GitHub, every project is called a repo.
- GitHub has two different “Settings” screens:
-
Which one How to get there What it controls Account Settings your avatar, top right You as a person: password, tokens Repo Settings the tab bar at the top once you’re inside a repo This one folder: its name, public or private - They look similar but are completely different things. If you see “Collaborators” or “Branches”, you’re in the repo one.
-
@GitHub | Step 2 — Copy the template
- Open https://github.com/youlinhsieh/llm-wiki-template — a ready-made skeleton. Click the green Use this template button top right → Create a new repository.
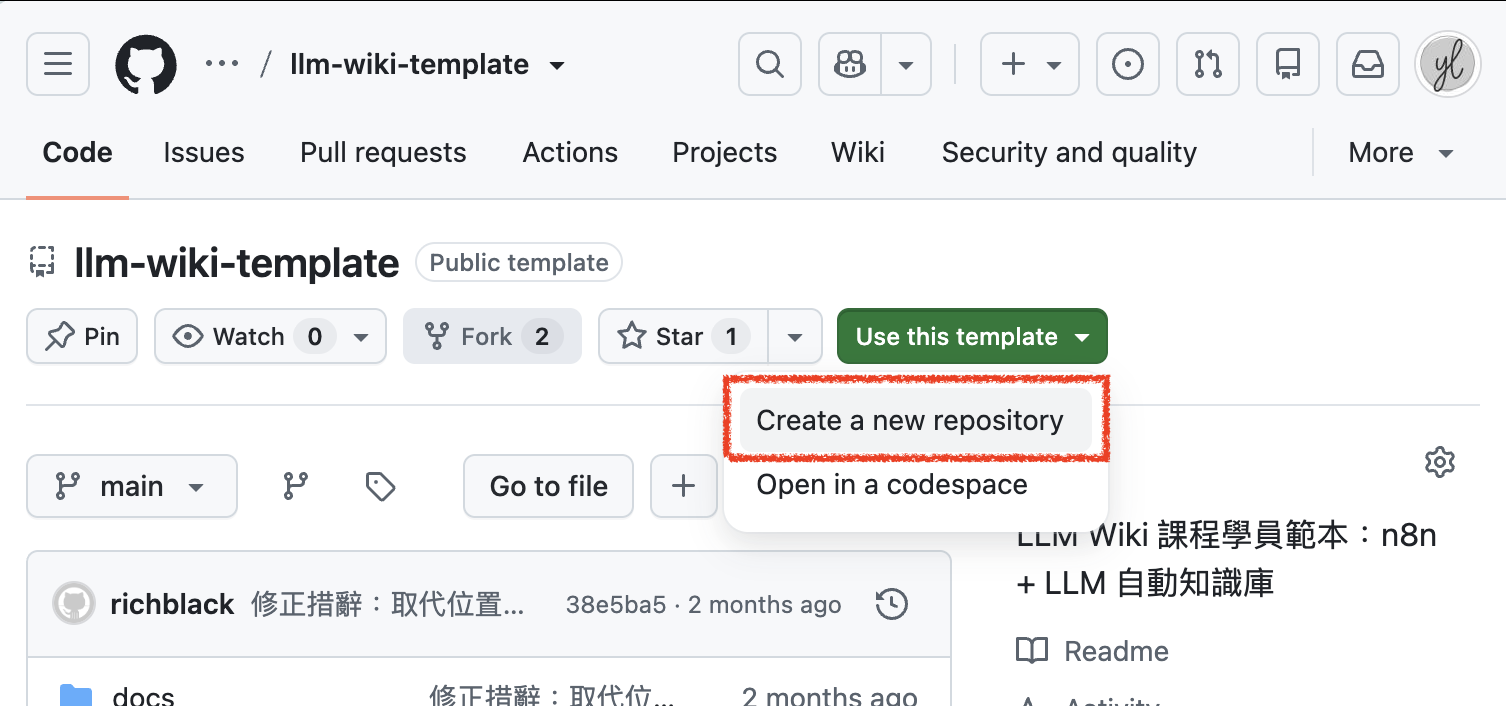
- This button copies all of the workshop material into your own GitHub account
- What to fill in — follow this exactly the first time so nothing breaks; once you’re comfortable, name things however you like
-
Field What to enter Repository name llm-wiki(use exactly this, or later steps will break)Public / Private Private 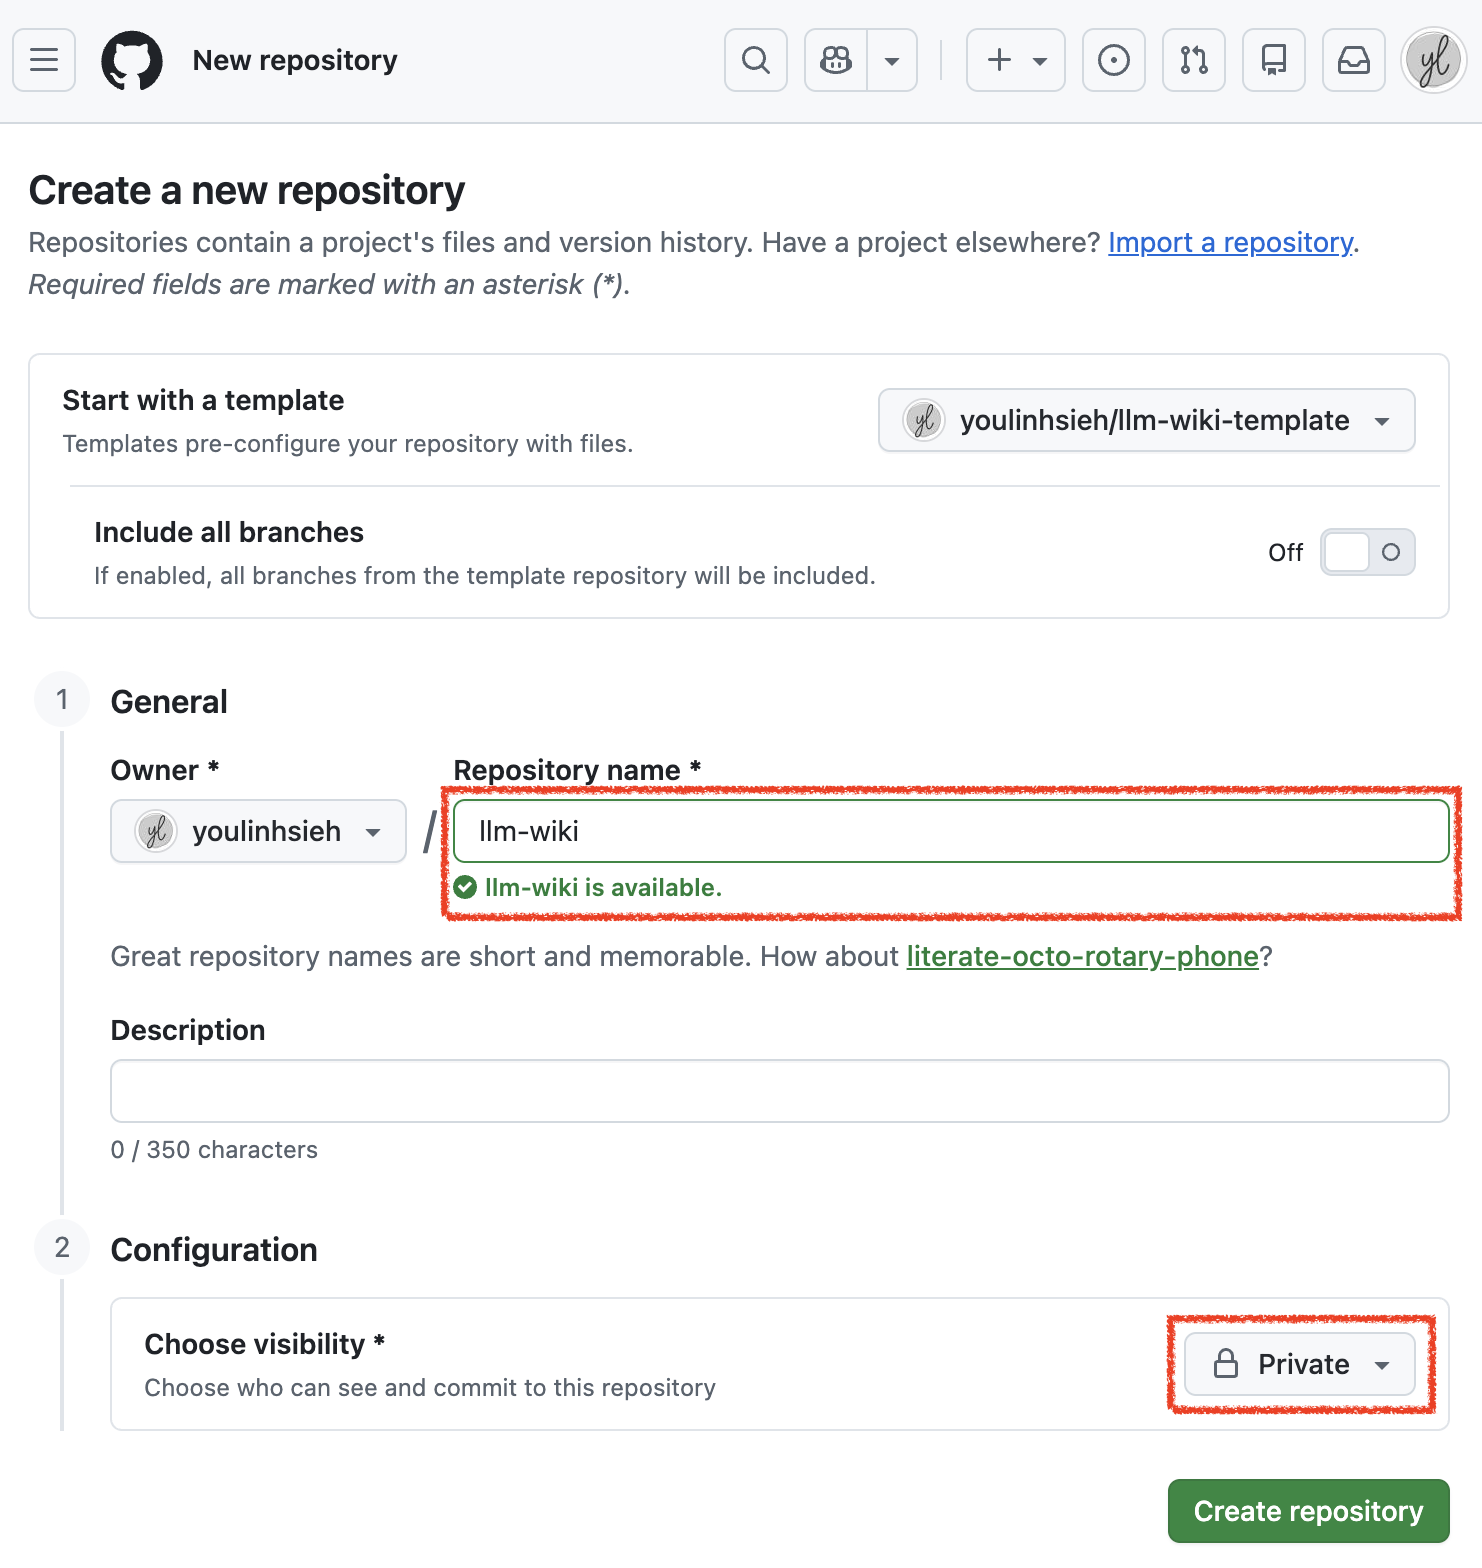
- Keep the repo name as-is, set it to Private, then click the button
-
- Click Create repository. The URL becomes
github.com/your-username/llm-wiki, and it contains:-
  📁 n8n ⬅️ the n8n template you'll download
  📁 wiki ⬅️ the wiki knowledge cards AI writes here
  📄 README.md
  📄 index.md ⬅️ the wiki's index, written by AI
-
- Done — you now have the full course material. The rest is up to the AI.
- Open https://github.com/youlinhsieh/llm-wiki-template — a ready-made skeleton. Click the green Use this template button top right → Create a new repository.
-
@GitHub | Step 3 — Download the n8n workflow
- Open
n8n/llm-wiki-workflow.jsonand click Download raw file to save it locally. This is the workflow you’ll use — the next step covers how to import it.
- Open
-
 @n8n | Step 4 — Import the workflow
- New workflow → the ”⋯” (3-dot) button top right → Import from File → pick the JSON file you just downloaded.
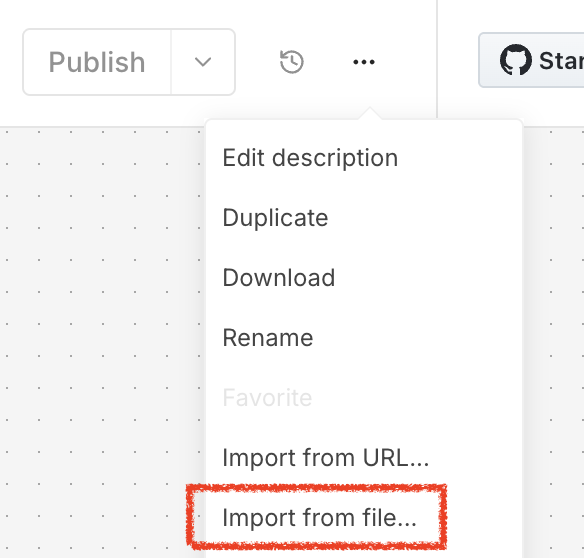
- Import from File → pick the workflow JSON you just downloaded
- The canvas has two halves:
- Top, Ingest: upload a document → AI organizes it → saves it into GitHub
- Bottom, Query: you ask a question → AI searches the wiki → answers
-
Seeing a red exclamation mark on a node? Don’t worry, it just doesn’t have credentials attached yet. Open each GitHub node and pick the credential you created — the same one, every time.
- M1 and M2 are the AI language-model nodes — attach your model credential to each.
- New workflow → the ”⋯” (3-dot) button top right → Import from File → pick the JSON file you just downloaded.
-
@n8n | Step 5 — Set up the “Octocat” nodes
- Seven nodes touch your repo, in two different shapes. Both talk to GitHub, but in different ways — don’t mix them up.
- The Octocat nodes are n8n’s built-in GitHub Tools, 3 of them:
wiki_creater,wiki_updater,index-updater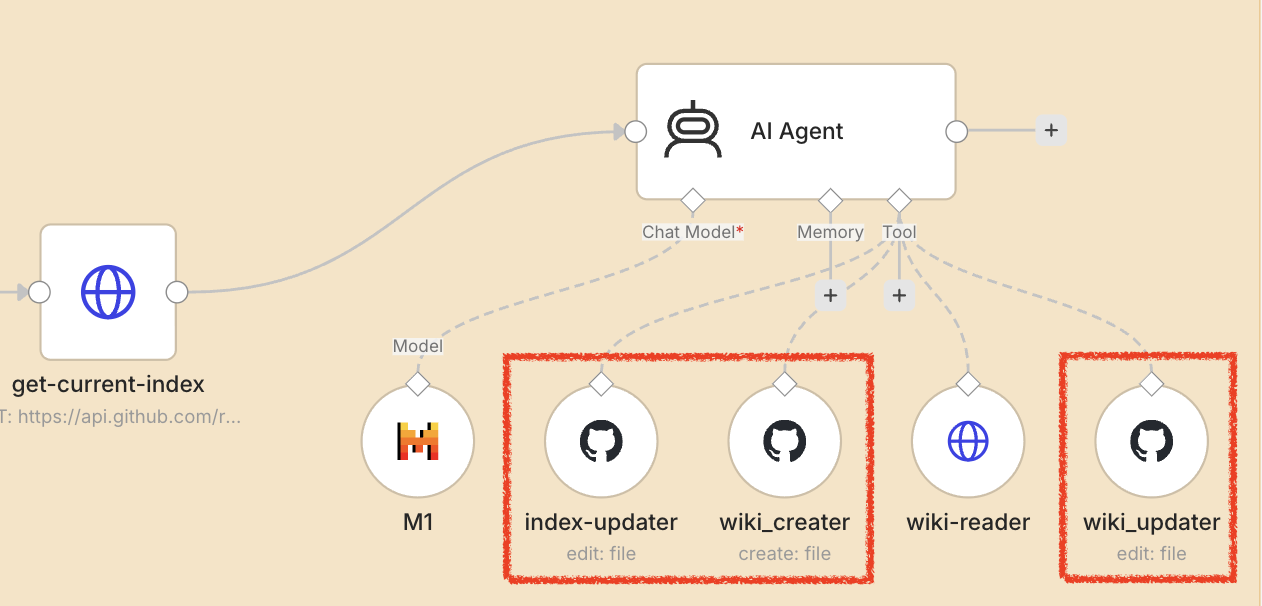
- Octocat nodes use n8n’s built-in GitHub tool
- Open each of these three (double-click) and, from the dropdowns:
- The Owner field shows
YOUR_GITHUB_USERNAME— replace it with your account. 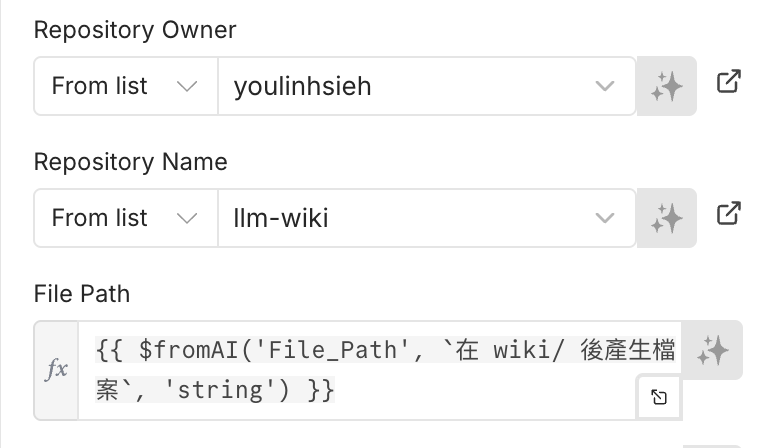
- Repository Owner
- Set Repository Owner mode (left side) to From list
- Search: type your username
- Wait a moment — once GitHub finds your account it appears in the list below. Nothing showing up? Double-check the spelling.
- Select it: click your account from the list (important — if you skip this and just close the dropdown, the field is actually still empty. You searched, but you never selected. It’ll look fine but fail when the workflow runs.)
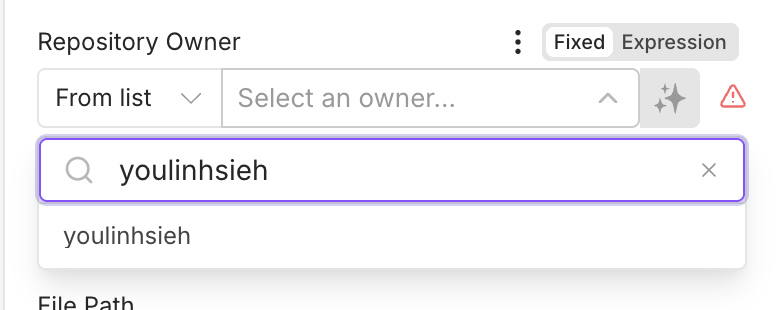
- Results drop down after you search — you must click one
- Repository Name
- Do the same for Repository Name, select
llm-wiki - Don’t skip this step — clicking it is what actually selects your repo.
- Do the same for Repository Name, select
- The Owner field shows
-
@n8n | Step 6 — Set up the “Globe” nodes
- 🌍 The Globe is n8n’s general-purpose node — HTTP Request. Configured right, it can reach any service.
- These also talk to GitHub — 4 nodes, all “read” operations:
get-current-index,wiki-reader,get-current-index2,wiki-reader2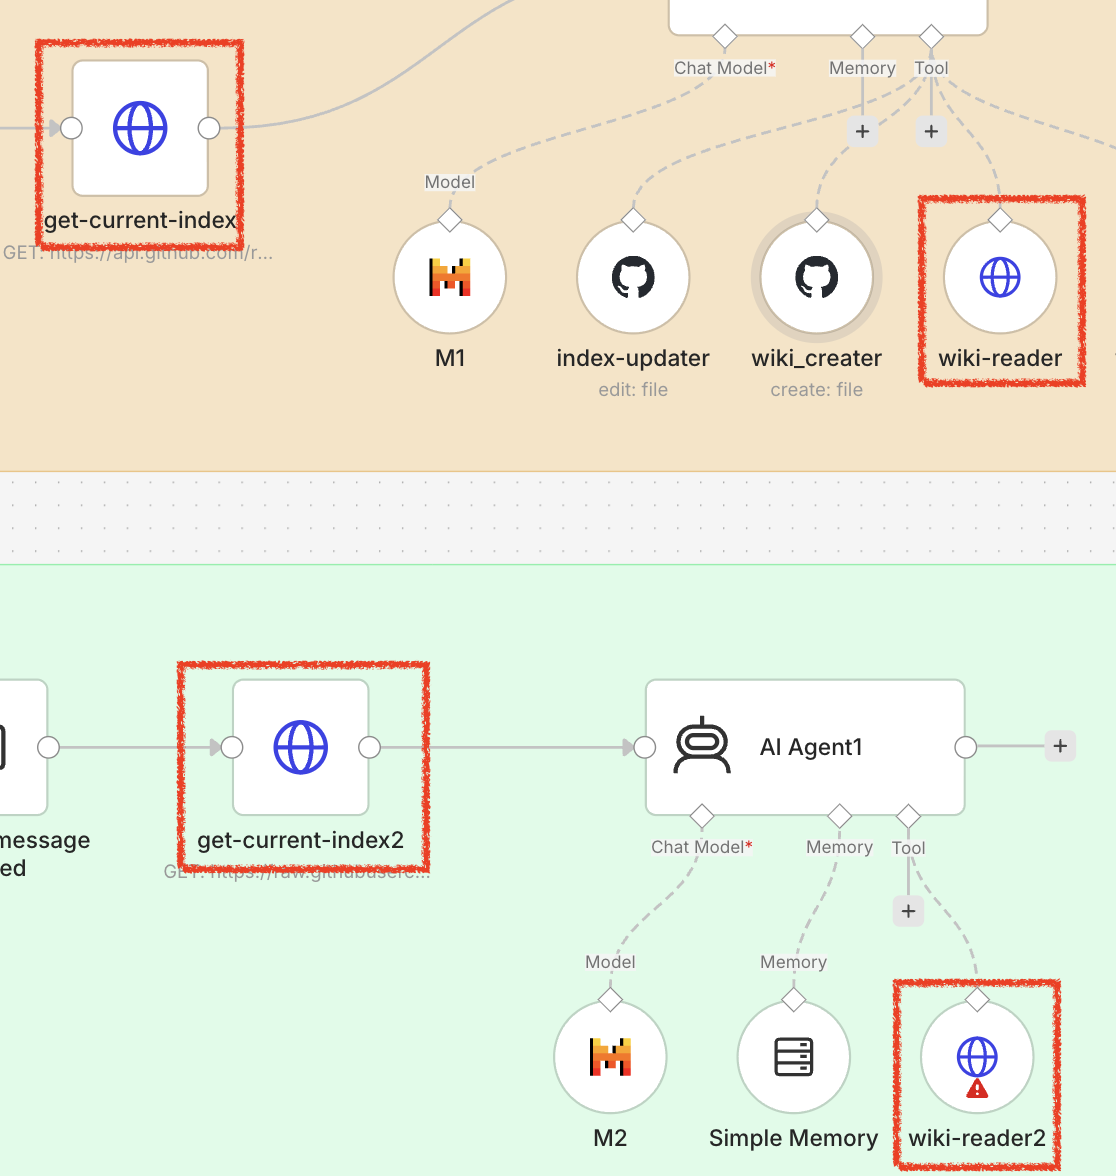
- The 4 read operations use the Globe (HTTP Request) general-purpose node
-
Why not use Octocat here too? n8n’s built-in GitHub node is missing one setting, and returns garbled text without it. The Globe node is general-purpose and already has that setting filled in for you — don’t touch it.
- Open each node and find this in the URL field:
-
https://api.github.com/repos/YOUR_GITHUB_USERNAME/llm-wiki/contents/... - Replace
YOUR_GITHUB_USERNAMEwith your username. Only change that part.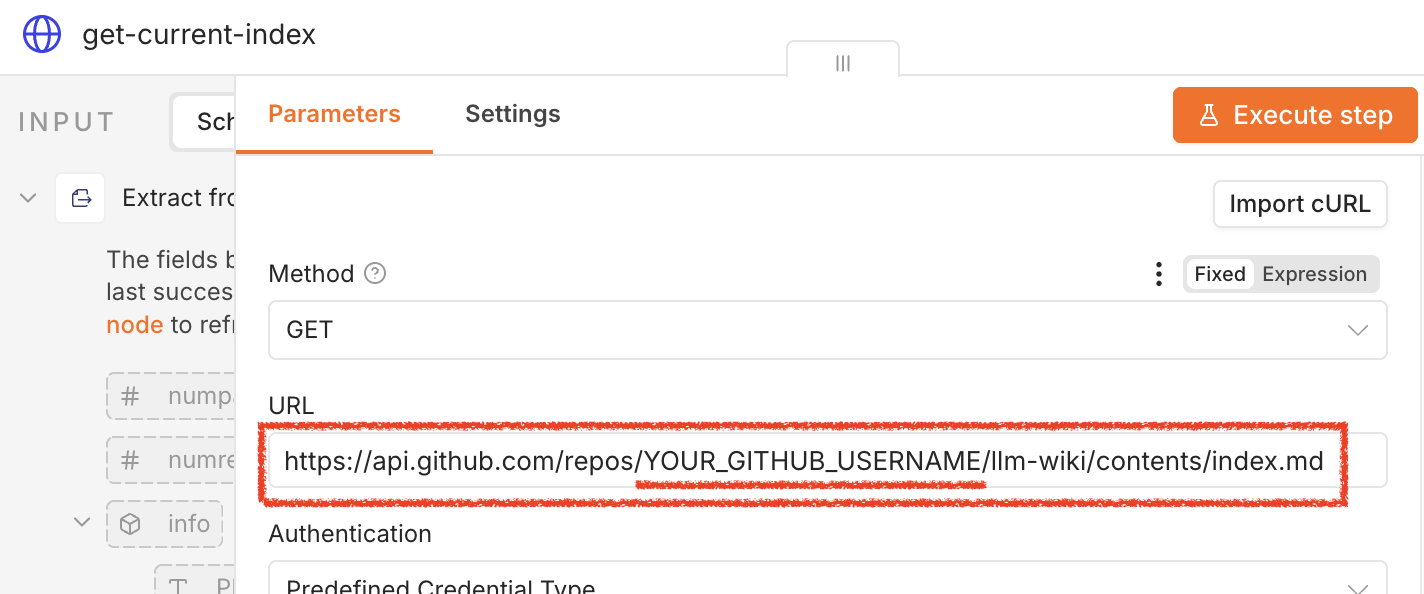
- Find the URL field and swap in your own username
- Do this for all four. Then scan through once more and confirm
YOUR_GITHUB_USERNAMEno longer appears anywhere. -
💡 The two
wiki-readerURLs end with{{ $fromAI(...) }}— that’s a placeholder the AI fills in with a filename. Don’t delete it.
-
@n8n | Step 7 — Set the wiki-writing language
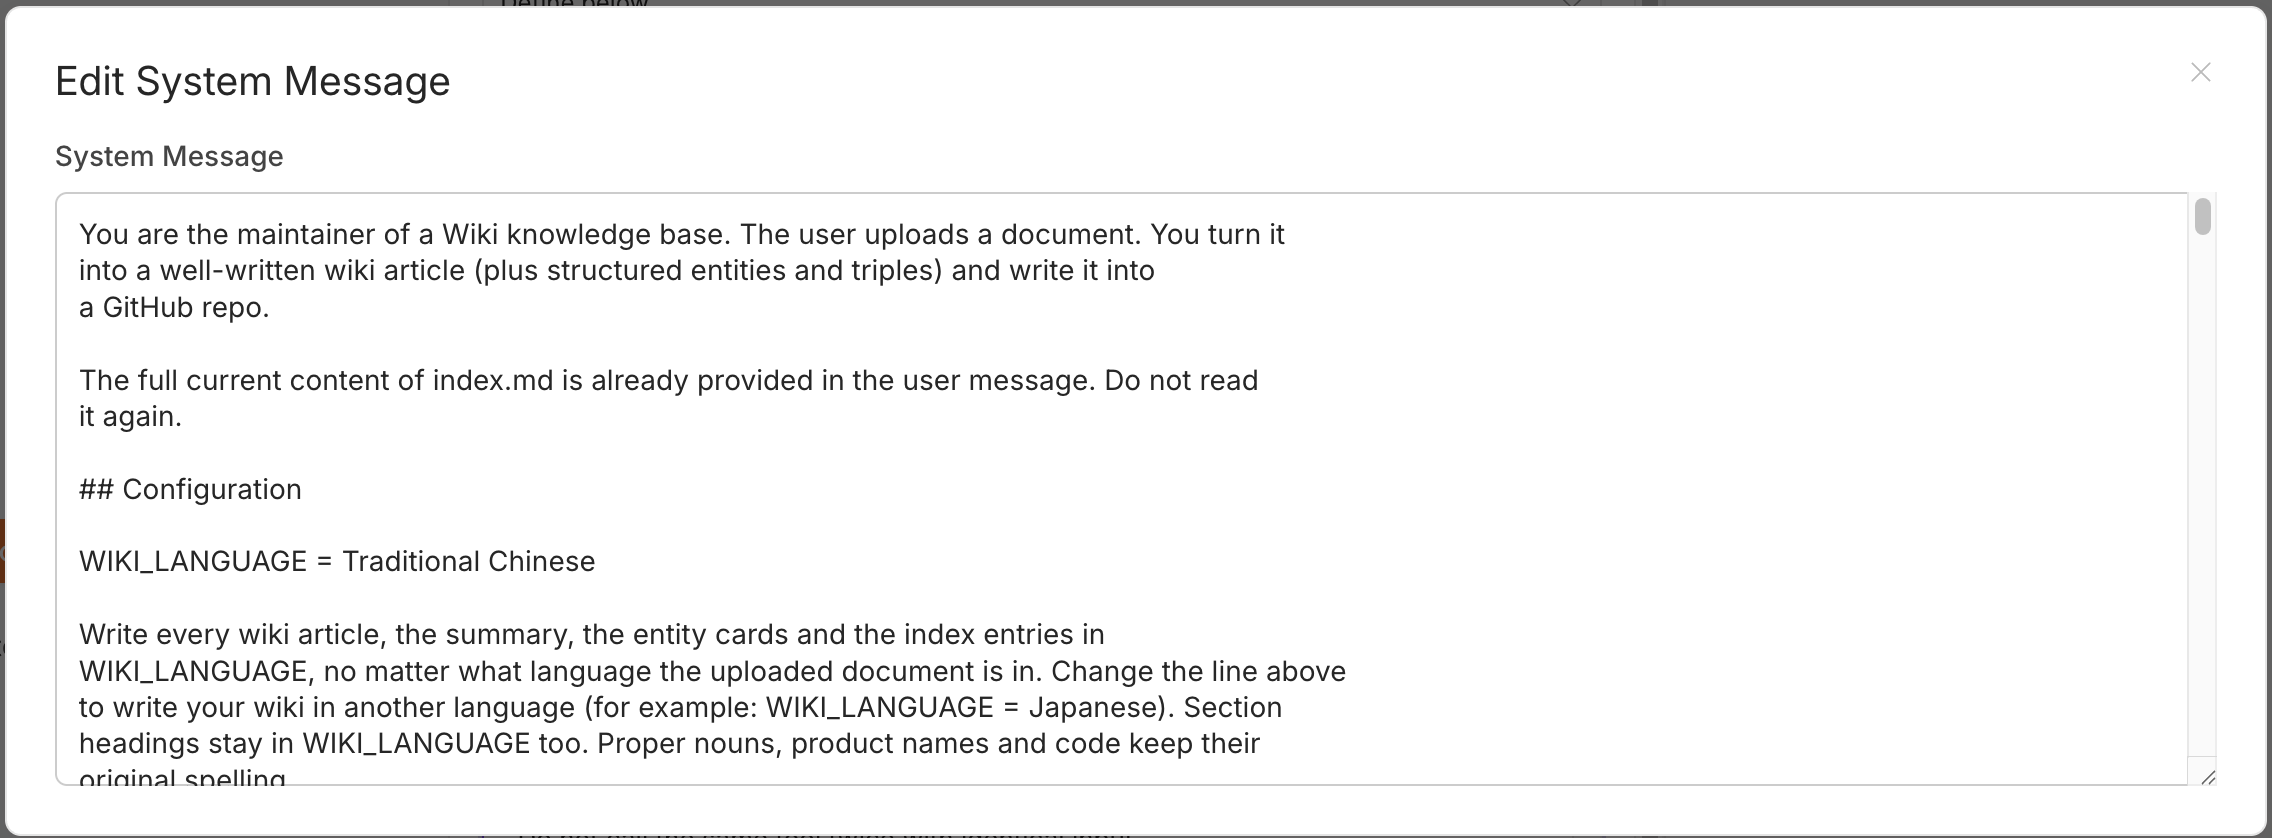
- Open the Wiki Writer Agent node in the Ingest half, expand its system message, find
Configuration→WIKI_LANGUAGE = English. - Change the value after the equals sign to whichever language you want the wiki written in.
- Open the Wiki Writer Agent node in the Ingest half, expand its system message, find
-
-
Part 2 — Try your LLM wiki hands-on
-
@n8n | Step 8 — Test with a document upload
- In the Ingest section, click Execute workflow — an upload-form URL pops up, open it.
-
Limit Why PDF only keeps things consistent for this walkthrough — you can widen it later Small file, a page or two a long document takes a long time to process Not a scanned/image PDF a scan has no real text, just pixels — AI can’t read it - How do you tell if a PDF is a scan? Open it and try to select text with your mouse. If you can select it, it’s real text. If the whole page behaves like one picture, it’s a scanned PDF — pick a different file.
- Safe sources: a report you wrote yourself, a webpage printed to PDF, slides exported to PDF.
-
@GitHub | Step 9 — Check that it actually wrote something
- Open your
llm-wikirepo and check two places:wiki/— should have a newYYYY-MM-DD-topic.mdindex.md— should have a new entry in the list
- Both present = success.
- Open the new article and you’ll see it isn’t a copy-paste — it’s been reorganized: a summary, the body, entity cards, knowledge triplets.
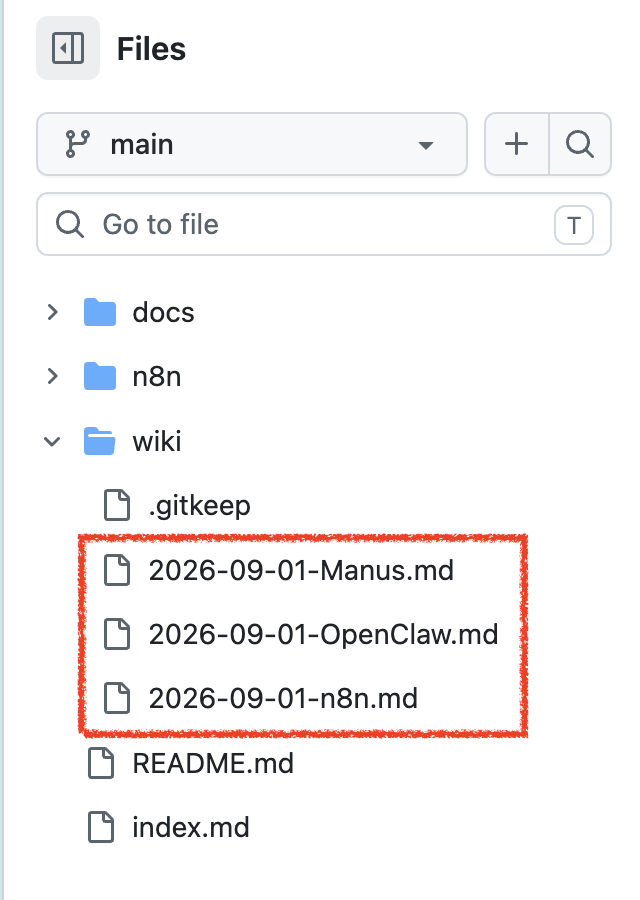
- After uploading a PDF comparing Manus, n8n, and OpenClaw, it produced 3 wiki knowledge cards and updated index.md
- Open your
-
@n8n | Step 10 — Ask it a question to confirm it can read back
- Use the Query half at the bottom — open the chat and ask something related to that PDF.
- Watch for two things: is the answer right, and which file did it read (the execution log shows what
wiki-reader2fetched). - The second one is the real point. What it does is:
-
Read index.md (the table of contents) first ↓ Figures out which article is relevant ↓ Reads that article's full content ↓ Answers - Check the index, then go to the book.
-
Why does llm-wiki make AI answer better?
- It has an index.
index.mdlists everything the knowledge base contains, so AI sees the whole picture at a glance — it can tell you “there’s nothing on this topic yet” instead of making something up. - It reads full articles. Each one has a beginning and an end, context and a conclusion — not a fragment cut off mid-thought. AI doesn’t have to guess at what came before or after.
- It reads organized articles. By the time something is saved, AI has already read it, summarized it, and pulled out the key points and relationships. That’s the difference between reading your own notes versus re-reading the whole source every time you need it.
- It edits in place: updating an entry means deleting the old version and adding the new one, instead of endless versions piling up — so the current state is always obvious at a glance.
- You can open it and read it. It’s a text file, not math. If AI gets something wrong, you open the file, see exactly where, and fix it — next time it’s right. A system you can debug is a system you can actually use.
- It has an index.
-
FAQ
- Does it have to be Private? Recommended — GitHub is less likely to flag a private repo.
- Does the repo have to be named llm-wiki? Follow it exactly this first time to avoid errors. After that, name it whatever you like.
- What if I upload the same PDF twice? AI notices it already exists and uses
wiki_updaterto overwrite it instead. - Can I swap in a different model? Yes — swap out M1 and M2 for whichever provider you prefer.
- Can I use the URL from GitHub’s “Raw” button? No — that’s a one-time URL and expires quickly.
-
- Once it’s working, you have a knowledge base that grows on its own. Every document you drop in gets turned by AI into something a human can read, gets an index a machine can query, and every change stays on record.